There is nothing as good as having a good Windows 10 backup. Having a multiple of it isn’t bad also as you can have as many backup as possible. Backing up your entire computer on your Windows PC is super easy using the System Image Utility and can be a lifesaver when the unexpected happens.
Alot of people might think it is not necessary to do a system backup, as you might not have any issue with your PC. But what if something happens and you lose your entire files. That’s why this feature come in handy as it offers a complete restoration in the case of hardware failure or system error.
System Image Backup comes in handy to make a base backup of your PC, which includes the Windows installation, latest updates, special configurations, and programs. For the file backup, File History and OneDrive works well.
Follow the instructions below to perform an image backup in Windows 10.
These steps work perfectly for Windows 8.1 also.
1. Right-click the Start button and launch Control Panel.
2. Click File History.
3. While in File History, click the System Image Backup link at the bottom-left corner of the screen.
4. Connect an external USB drive with enough free space.
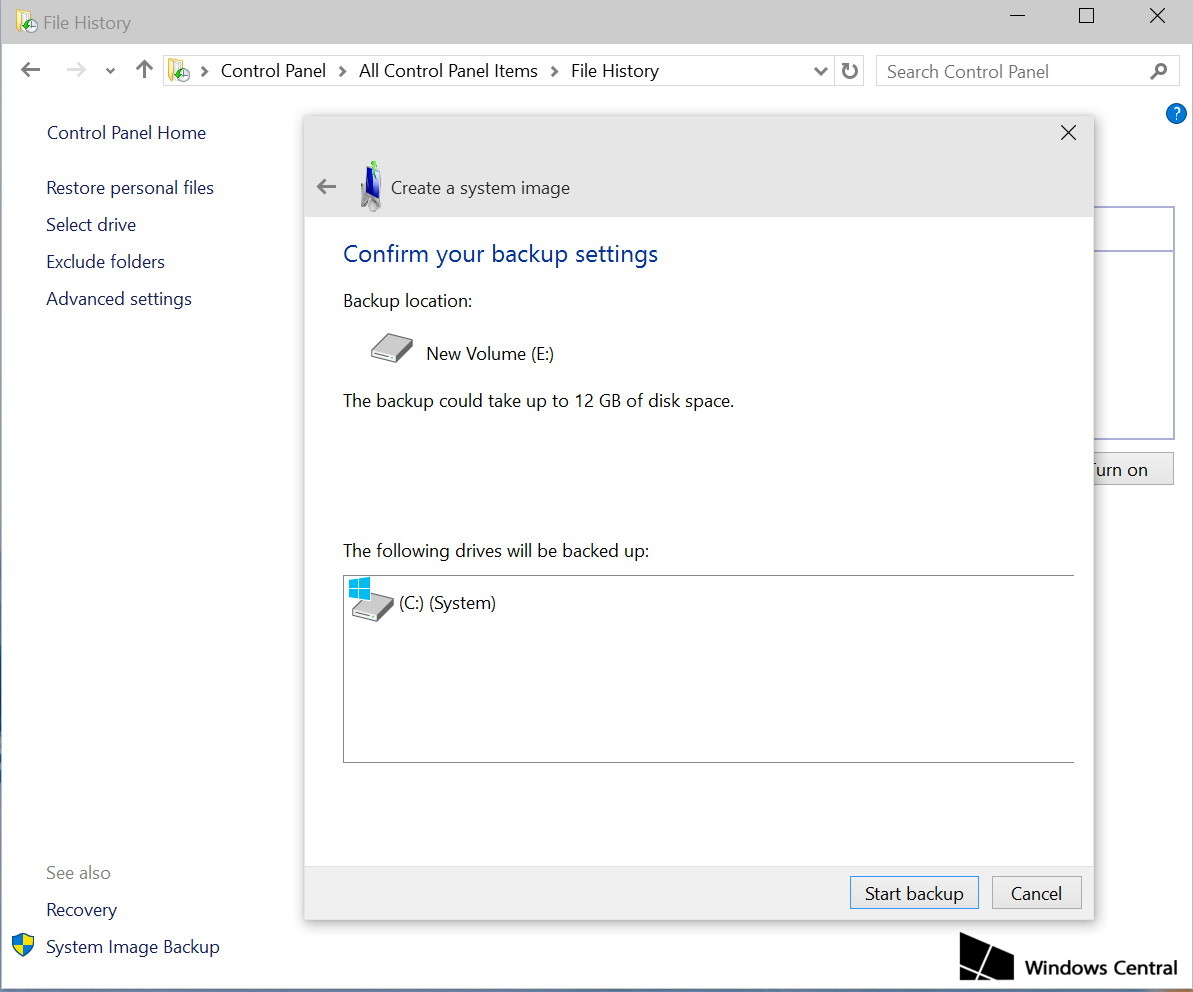
5. In the backup wizard, you’ll be prompted to choose from one of the three options to save the backup. For this example, we are going select the connected USB drive. However, DVD and network backups works too, but these options will slow down the backup process.

6. Click Next.
7. Confirm and begin the process by clicking Start Backup.
The backup process could take between 10 minutes to 2 hours, depending on the amount of data to be backed up.
And yes, during the backup process, you can use your computer as you would normally do.
After the System Image Backup utility completes the task, remember to always keep the USB drive in a safe location.
To restore your computer from the backup, connect the USB drive with the system image backup and reboot your computer with the Windows installation media.
During the Windows Setup, click Next, then click the Repair your computer link in the bottom-left corner of the screen. Click on Troubleshoot, click Advanced options, and select System Image Recovery. Now select the target operating system you want to recover, click Next and Finish.
----------
If you liked this article, please subscribe to our YouTube Channel for tech news, reviews and video tutorials. You can also find us on Twitter, Instagram and Facebook.


My Windows 10 laptop will not backup to a flash drive. First it told me it had to be formatted NTFS, so I formatted it NTFS. Now I get error messages only. Set up Backup
Scheduled backup of system image is not allowed on removable devices. You can try to save a single system image on this device by clidking “Create a system image” in the Windows 7 File Recovery Control Panel. OK
?????? This is a Windows 10 computer.
Set up Backup “The selected backup location does not support the creation of system images.”
Hello David, What’s the flash drive size? it is recommended to use a USB drive with 128GB.