At first i thought it would need an expert to change the PS4 HDD, Then i came across Playstation Support article on how to do this, which i tried and worked awesomely.
And for those of you that think this would void your PS4 warranty, Be rest assured.. It won’t.
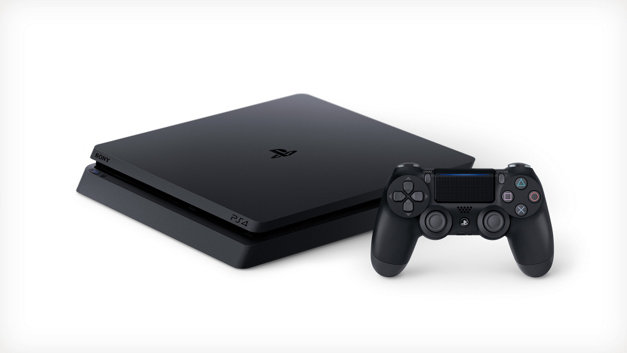
- Before you can do the HDD swap, Make sure you have the right storage as the officially supported drives for the PS4 system are 2.5 inch internal type (9.5mm or slimmer) and Serial ATA (Parallel ATA is not supported). Notwithstanding, Other types of drive may work, The listed drives above is the recommended from SONY Playstation.
These are the four main steps to replacing the hard disk drive. Each of these is explained in detail in this article.
- Do a full backup of the old drive.
- Change the hard drive.
- Reinstall the system software.
- Restore the content from the backup.
BACKUP YOUR SAVED GAME DATA
To backup data saved in PS4™ system storage to a USB storage device, or use the device to restore backed up data to your PS4™ system.
Connect the USB storage device you want to use for the backup, and then select (Settings) > [System] > [Backup and Restore].
NOTE: Do not turn off your PS4™ system while backing up or restoring data. Doing this might damage your system.
Use this function to copy the data saved in PS4™ system storage to a USB storage device. The name of the backup data file is automatically set with the date and the order it was saved. You can add notes in [Description].
- FAT or exFAT formatted USB storage devices are supported.
- Be sure to fully insert the USB storage device into the USB port. Some devices are not compatible due to shape or design.
- Trophies are not included in the backup data. To save the trophies you’ve earned to PlayStation™Network servers, select (Trophies) from the function screen, press the OPTIONS button, and then select [Sync with PlayStation Network].
- All user data is included in the backup data.
- Users who have never signed into PlayStation™Network can restore saved data to only the original PS4™ system that was backed up. To restore saved data to another PS4™ system, you must sign in to PlayStation™Network before backing up data.
- Saved data can be copied for each individual user.
To upload to the cloud, you must be a PlayStation Plus subscriber.
- To upload saved data to online storage, select the saved data and then select [Upload]. When you save data to online storage, you can then download the data to another PS4™ system and continue playing the game.
REPLACE THE HARD DRIVE
- Make sure the PS4 it turned completely off. When the power indicator is off, the system is completely off. If the power indicator is lit up in orange, the system is in standby mode. Exit standby mode.
- Unplug the AC power cord, and then disconnect the other cables from the system.
- For safety reasons, remove the plug for AC power cord from the electrical outlet, and then detach the other cables.
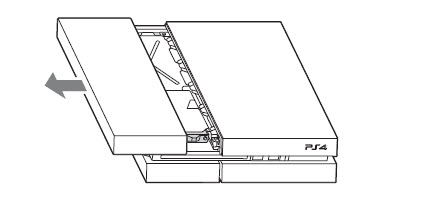
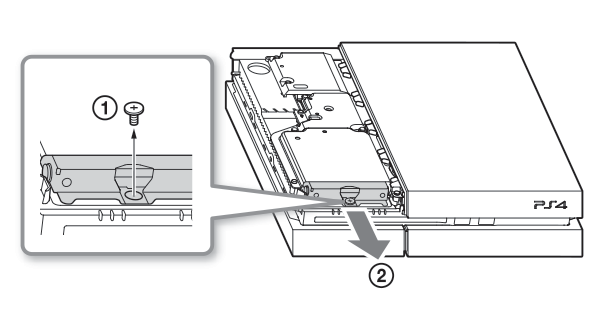
1.Slide the HDD bay cover in the direction of the arrow to remove it.
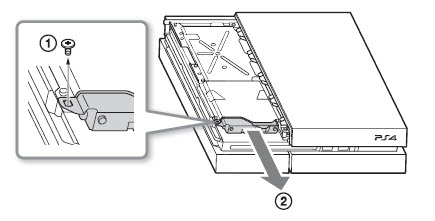
2.Remove the HDD: Models CUH-1001 through CUH-1115
- Remove the screw.
- Pull the HDD toward the front of the system to remove it.
- Go to step 4
3. Remove the HDD: Model CUH-1215
- Remove the screw.
- Pull the HDD toward the front of the system to remove it.
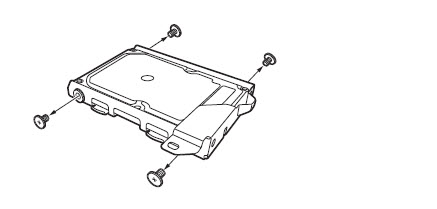
4. Using a Phillips screwdriver, remove the screws (four places). Do not remove the rubber inserts from the screw holes.
5. Place the replacement HDD on the mounting bracket for the PS4™ system’s HDD, and then attach using the screws (four places). Do not over-tighten the screws.
6. Attach the HDD to the system using the screw. Be sure to fully insert the HDD in the HDD bay.
Models CUH-2015
1. Slide the HDD bay cover in the direction of the arrow to remove it.

2. Remove the hard disc drive,
- Remove the screw.
- Pull on the hard disc drive with the mounting bracket to remove it.

3. Using a Phillips screwdriver, remove the screws (four places). Do not remove the rubber inserts from the screw holes.

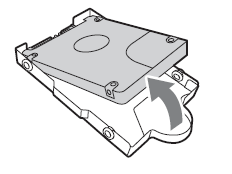
4. Remove the hard disc drive from the mounting bracket.
 5. Insert the replacement hard disc drive into the mounting bracket, and then secure it using the screws. Do not overtighten the screws.
6. Attach the HDD to the system using the screw. Be sure to fully insert the HDD in the HDD bay.

If you lose the HDD bay cover, screws, mounting bracket, or any other parts, contact technical support for assistance.
INSTALLING SYSTEM SOFTWARE
After the HDD has been replaced, the system software must be reinstalled. Using a computer, save a system software update file for reinstallation to a USB storage device. (1GB free space)
Click here and scroll down to the “Perform a New Installation of the System Software” section for instructions regarding downloading and performing the re-installation update.
Restoring backed up saved data for games to the PS4
To Copy all game and saved data from a USB backup:
- Connect the USB storage device you want to use for the backup.
- Select [System] > [Back Up and Restore]
Copy saved data from a USB storage device to the PS4 system by performing the following steps:
- Connect a USB storage device to the system.
- Select [Settings] from the function screen.
- Select [Application Saved Data Management] > [Saved Data on USB Storage Device] > [Copy to System Storage]
- Select a title.
- Press X to add a checkmark in the checkbox for the saved data you want to copy, and then select [Copy]
- You can redownload all of your previously downloaded by going to your Library.
You must be signed in with the same PSN account used when you first copied the saved data.
Restore saved data from the cloud by performing the following steps:
- Select [Settings] from the function screen.
- Select [Application Saved Data Management] > [Saved Data in Online Storage] > [Download to System Storage]
- Select a title.
- Press X to add a checkmark in the checkbox for the saved data you want to copy, and then select [Download]
- You can redownload all of your previously downloaded by going to your Library.
That’s it!
----------
If you liked this article, please subscribe to our YouTube Channel for tech news, reviews and video tutorials. You can also find us on Twitter, Instagram and Facebook.